You’ve invested in window film to shield your home from the harsh sun’s rays, maintain privacy, or simply add character to your windows. But, do you know how to properly install and maintain these films to extend their lifespan and maintain their efficiency? This article is your ultimate guide to understanding the nuances of window film installation and maintenance.
From the correct techniques of installation, to tips on cleaning and maintenance, to advice on when to remove and replace the film – we’ve got you covered. We’ll also delve into the pros and cons of DIY versus professional installation. So, whether you’re a seasoned DIY enthusiast or you’re considering hiring a pro for the job, this article will provide the insights you need.
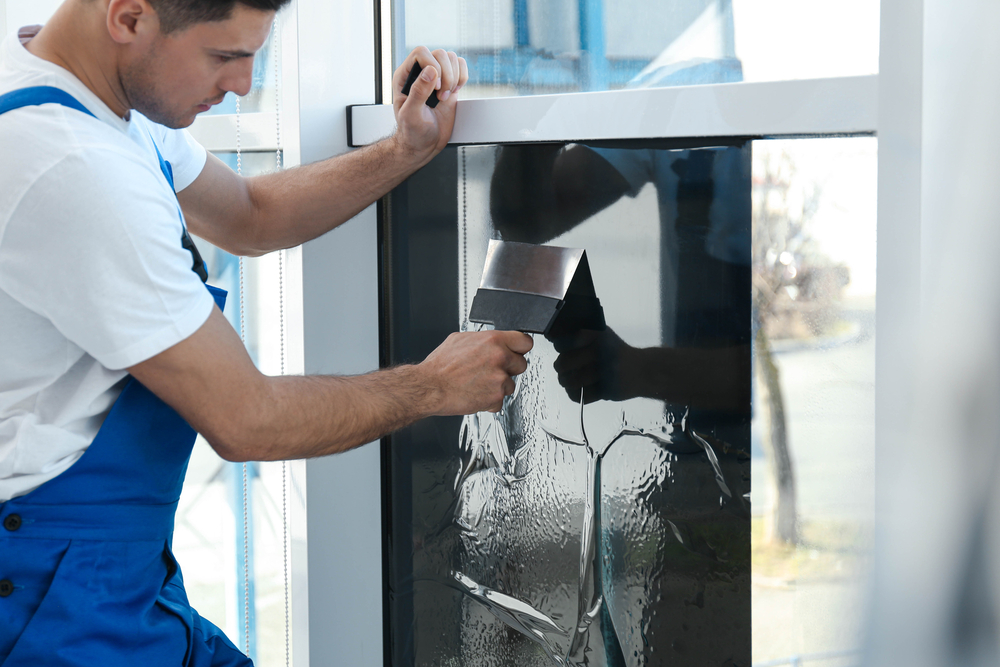
Proper Installation Techniques
You’ve got to admit, there’s nothing quite like the satisfaction of a well-installed window film, isn’t there? But, getting it right the first time isn’t a walk in the park, it requires skill and knowledge of proper installation techniques. When it comes to window film installation, the first step is always the preparation. Before you start, ensure your windows are clean, free from dust and grime that could interfere with the film’s adhesion. Then, prepare the solution, usually a mix of water and a small amount of soap, which you’ll use to wet the window surface before applying the film.
Now, let’s move to the actual installation. When your windows are well prepped and the solution is ready, it’s time to get down to business. Cut the film to the desired size, leaving an extra inch around the edges to give you room for adjustments. Peel off the backing from the film, and then spray the solution onto the window. Carefully place the film on the window, starting from the top and working your way down, smoothing out any bubbles as you go. Proper installation techniques involve using a squeegee or credit card to smooth out the film and push out any remaining solution underneath.
When all is said and done, your window film should be installed smoothly without bubbles or wrinkles. But remember, the job isn’t over just because the film is on the window. To ensure longevity, it’s important to maintain the film properly. Avoid cleaning the windows for at least a week after installation to allow the film to properly adhere to the glass. When cleaning thereafter, use a soft cloth and avoid abrasive cleaners that can scratch or damage the film. With the right installation and maintenance, your window film can provide beauty and energy efficiency for years to come.
Cleaning and Maintenance Tips
Keeping your protective coverings spotless and in mint condition doesn’t have to be a chore; with a few simple tips, it’ll be a breeze. One of the most important aspects of window film maintenance is regular cleaning. Don’t fret, this doesn’t mean you need to scrub your windows every day. Instead, cleaning once every few months with a gentle soap and water solution is enough to keep your window film in top shape. Avoid any harsh cleaning chemicals or abrasive tools that could potentially damage the product.
There are a few key tips to remember for the best results:
* Always use a soft, clean cloth or a rubber squeegee to avoid scratching the film.
* Never use ammonia or vinegar-based cleaning products as they can deteriorate the film over time.
* After cleaning, thoroughly dry the window film to prevent water spots.
Adhering to these maintenance tips will not only keep your window film looking its best, but also extend its lifespan. Regular cleaning and proper care can prevent the film from peeling, cracking, or fading prematurely. Remember, the goal is to protect and preserve your window film, so treat it with care. It’s worth mentioning that if you encounter any major issues, it’s best to consult a professional rather than attempting a DIY fix. While window film is a robust product, it still requires a gentle touch to maintain its pristine condition. Rest assured, with these tips in mind, maintaining your window film will be a simple and manageable task.
Removal and Replacement
When it’s time to retire your current protective coverings, don’t be daunted by the prospect of removal and replacement. This process can be a bit tedious, but it’s necessary for maintaining the quality of your windows. The first step in the removal process is to peel off the existing film. This can be done using a blade or scraper, but be careful not to scratch the glass. After peeling off the film, there may be some adhesive residue left on the window. You can easily remove this using a window cleaner or rubbing alcohol. Remember, proper removal is just as important as the initial window film installation.
Next step is the replacement of your window films. Before you start with the new installation, ensure the window surface is completely clean and dry. Select the right type of film for your needs, considering factors like heat reduction, UV protection, or privacy. Carefully measure and cut the film to match the size of your window. Apply the film slowly, smoothing it out as you go to avoid bubbles. If you’re not confident in doing it yourself, consider hiring a professional for the window film installation. They’ll ensure a bubble-free, perfect fit, enhancing the lifespan and effectiveness of the films.
Maintaining your new window films is crucial to ensure they last as long as possible. Regularly clean them with a soft cloth and a non-abrasive cleaner to avoid scratching or damaging the film. Avoid using harsh chemicals or abrasive tools as they can degrade the film over time. Remember, your window films are there to protect your home, but they also need some care. With regular maintenance, proper removal and replacement, your window films can serve you well for many years.
DIY vs. Professional Installation
Deciding between tackling the job yourself or hiring a professional can be a tough choice, and it’s one that ultimately depends on your comfort level and skill set. If you’re a DIY enthusiast, you might be tempted to do the window film installation yourself. After all, there are numerous tutorials and guides available online that can guide you through the process. However, window tinting is a precise job that requires a skilled hand and the right materials. Even a slight mistake can lead to bubbles or creases, ruining the aesthetic appeal and effectiveness of the film.
1. Time and Effort: DIY window film installation can be time-consuming, especially if you’re new to it. It’s not just about sticking the film onto the window, but also about cleaning the windows thoroughly, measuring and cutting the film accurately, and applying it without any bubbles or creases.
2. Quality of Work: Professionals have the right tools and experience to ensure a flawless installation. They know how to handle different types of window films and are aware of the tricks to apply them perfectly.
3. Long-Term Maintenance: A poorly installed window film might peel off or deteriorate sooner than expected, leading to frequent replacements and higher maintenance costs in the long run. On the other hand, a professionally installed film can last for years with minimal maintenance.
4. Warranty and Support: Most professional installation services offer a warranty for their work. This means if something goes wrong with the film within the warranty period, they will fix it for free.
The decision to go for DIY or professional installation should not only be about the cost but also about the quality and longevity of the installation. Remember that window tinting is not just about enhancing the looks of your windows but also about improving energy efficiency and UV protection. A poorly done job might not provide these benefits effectively. So, weigh the pros and cons carefully. Consider the time and effort you’re willing to invest, the quality you expect, the maintenance you’re ready to handle, and the support you would have in case something goes wrong.
Frequently Asked Questions
What are the different types of window films available on the market?
There’s a wide variety of window films you can choose from depending on your specific needs and preferences. You’ve got solar control films, which are perfect for reducing heat and glare, and safety and security films that offer an extra layer of protection against break-ins and accidents. If you’re into aesthetics, decorative films are sure to make your windows stand out while privacy films can provide you with the discretion you need. There’s also anti-graffiti films that can protect your windows from vandalism and low-e films designed to enhance energy efficiency. It’s all about figuring out what suits your requirements the best.
How long does the average window film last before it needs replacement?
The lifespan of your window film can vary greatly depending on a few key factors such as the type of film, the quality of installation, and the amount of direct sunlight your windows receive. However, on average, most high-quality window films tend to last between 10 to 15 years before they start showing signs of wear and tear. It’s important to remember that this is just an average; some films can last much longer if they’re well taken care of. Keep an eye out for signs of aging like fading, peeling, or bubbling. If you notice these, it might be time to consider a replacement.
Can window films improve the energy efficiency of my home or office?
Absolutely, window films can significantly improve the energy efficiency of your home or office. They work by reflecting and absorbing the sun’s rays, reducing the amount of heat that enters your space. This means your air conditioning system doesn’t have to work as hard to keep the temperature comfortable, which can lead to significant energy savings. Not only do window films help you save on energy costs, but they also reduce your carbon footprint, making your home or office more eco-friendly.
Does the installation of window film affect the warranty of my windows?
Yes, the installation of window film can potentially affect the warranty of your windows. Many window manufacturers will void their warranties if window film is applied, primarily because they cannot guarantee that the film won’t damage the glass. However, some window film manufacturers offer their own warranties that can replace the original one. It’s crucial to check both the window and film warranties before making any decisions. Every case is different, so make sure to clarify this detail with your window and film provider to avoid any unexpected issues down the line.
Are there any specific weather conditions that can affect the performance of window films?
Yes, there are specific weather conditions that can impact the performance of your window films. Extreme heat or cold can cause the film to expand or contract, potentially leading to bubbles or peeling. High humidity can also affect the adhesion of the film to the window. Additionally, exposure to intense sunlight over time can cause the film to fade or deteriorate. It’s always best to consider your local climate when selecting and maintaining your window films to ensure they perform effectively and last as long as possible.