Your home is your sanctuary, and maintaining its privacy is crucial. An essential part of this privacy comes from the window films that you’ve installed. However, like many things, these privacy layers need proper upkeep to ensure they’re performing their role effectively. When they start to deteriorate, it’s not just your privacy that could be compromised, but also the insulation and UV protection they provide. That’s why it’s important to keep an eye on them and know when it’s time for a window film removal and replacement.
In this article, you’ll learn how to identify signs that your window films need replacing. We’ll guide you through a step-by-step process of removing the old films without causing any harm to your windows. But that’s not all, we’ll also help you choose the right new privacy layer that fits your specific needs and show you how to install them successfully. With this guide, you’ll be able to maintain the comfort, privacy, and energy efficiency of your home with ease.
The Importance of Properly Maintaining Privacy Layers
You don’t want to underestimate the importance of properly maintaining your privacy layers, as they’re not only crucial for your comfort, but also for your security. These layers, which might involve curtains, blinds, or more commonly, window films, act as barriers against unwanted onlookers. They’re your first line of defense against prying eyes, helping to keep your private life private. But they’re also there to protect you from harmful UV rays, reducing glare, and controlling the amount of heat that enters your home. So, it’s essential you ensure they’re always in top shape.
Imagine being in a room with window film that’s peeling off or bubbly. Not only does it look unattractive, but it also fails to serve its purpose. When your window film is damaged, it’s less effective at blocking UV rays and maintaining your privacy. You might even notice that your room becomes hotter than usual. That’s why you can’t afford to ignore the state of your window film. And when it comes to window film maintenance, removal, and replacement are often necessary steps to keep them functioning optimally.
Regularly check your window films for signs of wear and tear. Are they starting to curl at the edges? Can you see bubbles or cracks? If so, it’s time for a replacement. You don’t need to stress over the process though. Removing and replacing window film isn’t as daunting as it may seem. It’s something you can DIY if you’re handy, or you can hire professionals to do it. Either way, the important thing is you’re taking steps to maintain your privacy layers, ensuring they continue to protect your home and your privacy just like they’re meant to.
Identifying Signs of Deterioration
Spotting the tell-tale signs of wear and tear isn’t rocket science, but it’s crucial for keeping your view clear and your room’s aesthetics pleasing. Over time, window films may start to show signs of deterioration that can affect not only their functionality but also the overall appearance of your space. Peeling edges, bubbling, or discoloration are some of the most common signs. If you notice any of these, it’s a clear indicator that it’s time for a window film change. Don’t ignore these signs; they’re your first cue to take action.
The next step is to assess the degree of deterioration. If it’s minor, like a small bubble or a slight discoloration, you might be able to postpone the replacement for a while. However, if the film is peeling off in large sections, or the bubbles are spreading across the film, it’s more urgent. The same goes for significant discoloration or any scratches that are affecting your view or letting in too much sunlight. These are signs that the film has been compromised and is no longer providing the level of privacy or protection you need.
Remember, window film isn’t just about aesthetics; it’s also about privacy, protection from harmful UV rays, and energy efficiency. If your window film isn’t performing as it should, it’s not just an eyesore – it’s a potential risk. Regular checks for signs of wear and tear should be part of your general home maintenance routine. It’s better to replace deteriorating film sooner rather than later to ensure you’re getting the full benefits that window film can offer. By staying attentive to the condition of your window films, you can keep your home comfortable, private, and energy-efficient.
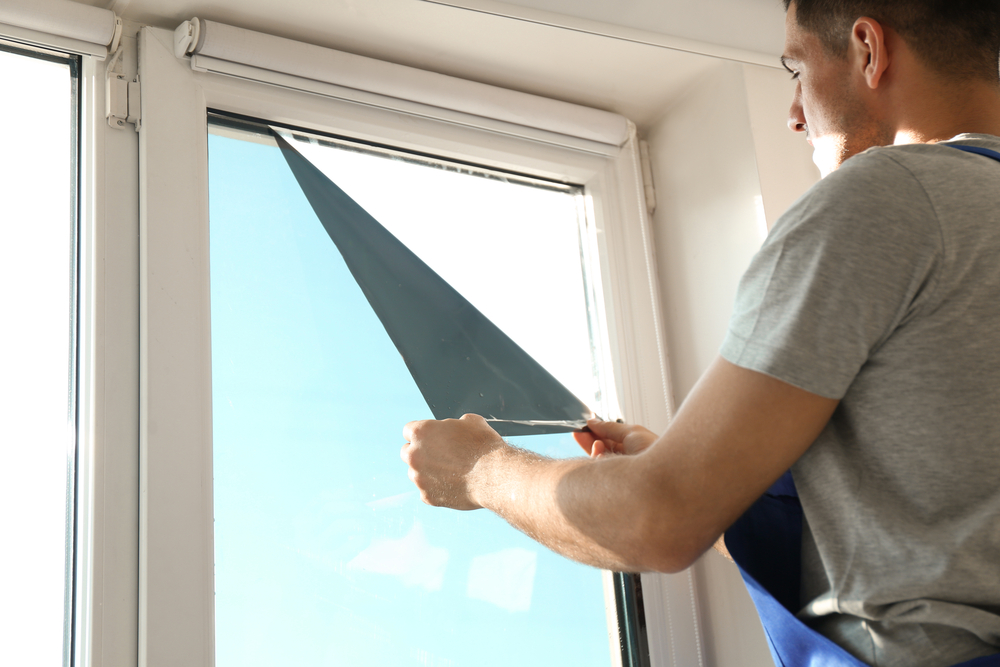
Step-by-Step Guide to Removing Old Films
It’s essential to know how to properly get rid of those old, worn-out coverings on your panes. Whether you want to replace them with new ones or simply enjoy the unfiltered view, removing window films is a task that requires patience and the right technique. Here’s a step-by-step guide to help you through the process.
1. Warm Up The Film: The first step is to warm up the film using a hairdryer or heat gun. It’s crucial to do this at low heat to avoid damaging the glass. Aim the heat towards a corner of the film until you can see it start to peel off.
2. Peel Off The Film: Once the film is warm enough, carefully start to peel it off from the corner. Use a razor blade or a scraper to aid in the process, but be cautious not to scratch the window. If the film breaks or tears, just reheat the next section and continue peeling.
3. Clean The Window: After removing the film, there will likely be adhesive residue left on the glass. You can remove this with a mixture of warm water and dish soap. Apply the mixture to the window, then use a sponge or a cloth to scrub off the residue. Once you’ve removed all the adhesive, rinse the window with clean water and dry it thoroughly.
Remember, patience is key when removing window films. If you rush the process, you risk damaging the window or leaving behind stubborn adhesive residue. It might take some time and effort, but with this guide, you should be able to handle the task like a pro. So, roll up your sleeves, gather your tools, and get to work. You’ll be enjoying the view through your clear, film-free windows in no time.
Choosing the Right New Privacy Layer
After peeling off the old layers, picking out a new privacy screen becomes your next artistic endeavor, transforming your panes into a canvas for light and shadow play. Indeed, choosing the right window film is key to achieving your desired level of privacy, light control, and aesthetic appeal. There is a wide array of types, designs, and shades to choose from. Whether you’re looking for a clear film that provides maximum light entry without compromising privacy, or a tinted one that adds a touch of color to your rooms, you’ll find something that suits your taste. Remember that the window film you choose should also be able to withstand different weather conditions.
When choosing a new privacy layer, you should also consider the functionality of the room. For instance, if the window is in your bedroom, you might prefer a darker film to block out light for better sleep. On the other hand, if it’s in your living room or kitchen, a lighter film that allows more natural light to filter through would be ideal. It’s also crucial to consider the window’s direction. South-facing windows, for instance, receive more sunlight than those facing north, so you might want a film with higher UV protection for these.
On top of light control and privacy, another factor you can’t afford to overlook is the installation process. Some films are self-adhesive, making them easy to install and remove, while others require professional installation. If you’re a DIY enthusiast, you might prefer the former, but if you want a perfectly smooth finish without the hassle, the latter could be your best bet. Be sure to take your time and weigh all these factors carefully before making your decision. After all, the right window film can enhance not only your privacy but also the overall look and feel of your home.
Installing Your New Insulation Layer Successfully
Getting your new insulation layer installed correctly is key to maximizing its benefits, and believe it or not, you can do it yourself with a little know-how and patience. Start by cleaning your window surface thoroughly. Any dirt, grime, or residue can interfere with the adhesion of the film, so make sure you’re working with a squeaky clean surface. Measure your window and cut the film to size, leaving an extra inch on all sides for adjustment. Remove the film’s backing slowly, applying it smoothly to the window as you go. Use a squeegee or credit card to smooth out any bubbles as you apply the film.
The next step is to trim the excess film. Use a sharp utility knife and carefully follow the edge of the window frame, ensuring a clean, straight cut. Be patient and take your time with this step, as rushing can result in jagged edges or a film that’s too short. After this, you’ll want to seal the film to the window. Use a heat gun or hairdryer to gently heat the film, which helps it adhere to the glass and tightens it up for a clear, seamless finish. Remember to keep the heat source moving to avoid burning the film or the window frame.
Don’t be discouraged if your first attempt doesn’t yield a perfect result. Applying window film is a skill that takes a bit of practice to master, so don’t be afraid to try again if needed. Keep in mind that the key to a successful installation is patience and meticulousness. So, take your time, pay attention to detail, and before you know it, you’ll have a brand new, energy-efficient window that not only looks great but also helps keep your home comfortable year-round.